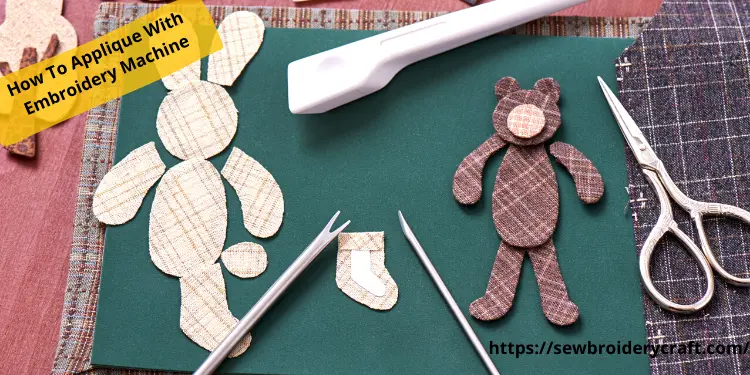
If you’re new to embroidery and don’t know how to use applique embroidery machine, you are at the right place. This article will show you how to machine embroidery applique designs by taking you through the steps by step approach.
What is an Applique?
The procedure of applique embroidery is basically stitching one piece of fabric on top of another. It can be done by hand, on a standard sewing machine, or with an embroidery machine. A satin stitch is usually used to connect the top applique fabric to the base cloth( learn how to do satin stitch on brother sewing machine to get best results). This is simply a zigzag stitch with a concise length such that each zigzag lies directly next to the previous one on the applique place. As a result, there is no visible space between the stitches; they appear to be a single continuous piece. The most frequent stitching style done around the outside edge of the applique cloth is known as a “satin stitch” finish. This finish will prevent the applique fabric from getting untying or frayed. Moreover, brother PE convert text into satin stitch within no time.
What is embroidered applique?
What is applique embroidery-applique and embroidery designs: is a piece of fabric with a decorative stitch border sewed onto another fabric. Instead of using thread to produce fill-stitches, you fill and color a design using a piece of cloth and make latter patches with embroidery machine. This saves thread while also reducing the thickness and puckering on designs that might look too dense on lightweight fabrics. At the same time, appliques require more interaction and reduce your time for sewing on an embroidery machine. You can also stitch appliques can by hand, sewing machine, or embroidery machine, but machine embroidery appliques is by far the fastest and most accurate method.
How to applique
To get the perfect results, watch tutorial on machine applique and follow the accurate method on how to use applique patterns embroidery machine, especially learn how to machine embroider applique on kids clothes, as it is most in demand fashion. First of all, prewash both your base and applique fabrics. This will help you to remove all the wrinkles and instability from the fabric that help you to design the applicate embroidery more efficiently. Another reason is that the unwashed cotton appliques shrink excessively, which causes many problems if you wash them after applying the design. It will shrink the fabric and the applique design will look so ugly. To prevent your project from this kind of mistake in machine embroidery how to back up a step by step instructions given below to efficiently design the applique with the help of an embroidery machine.
Steps to embroider design on machine
1. Required Material
- For the applique piece, cut a small piece of (PRE-WASHED) fabric. Your applique fabric should not be too thin, nor should it be prone to untying.
- HeatNBond Lite piece the same size as the applique fabric piece
- Prewashed garment or fabric to which the applique will be applied.
- Scissors.
- Threads.
- Embroidery machine grabber for trim
- Simply applique user manual/simply applique software
2. Load Design on Embroidery Machine
You can also use easiest machine applique softwares and the USB connector or a direct PC connection to upload your own designs and fonts to the machine’s built-in memory specially if you are learning how to machine applique for beginners. The machine’s big Sew Smart LCD touch screen enables you to adjust presets in full colour and allows you to examine and edit all designs. You have to choose the perfect machine embroidery appliques design that you want to create on the fabric.
3. Prepare Applique Fabric
Always wash and dry your applique and base fabrics before starting this process. If you do not wash and dry these items before assembling them, you may have disastrous results when you wash and dry the finished products. Because the applique fabric and the base fabric shrink at different rates, you will have a bumpy mess specially when you show pictures of xlarge applique embrodery designs.Then cut out your applique fabric pieces because some designs have multiple applique areas; you will need to cut out fabric for each one, then replace grabber on embroidery machine. You should open your applique design in software such as SewWhat-Pro or
Embrilliance Essentials to determine the size of each piece and tack down embroidery file. Even free embroidery software can be helpful in determining how big each piece should be, so if you don’t have any, it might be worth purchasing it just for this purpose.Moreover, be cautious for children clothing to use for machine embroidery
4. Set-Up The Hoop
Hooping blanket for embroidery-You have to put the bottom of your hoop in place at this step. Apply a layer of Stabilizer on top, then place your final fabric on top. Apply the finish with the hoop’s top layer and tighten the hoop screw to hold everything together. Insert the hoop into your cricut embroidery machine by clicking it in place.
5. Stich Applique Outline
Now it’s time to stitch the applique outline on the base fabric, you know, you can embroider multiple lines pe770 brother courtesy . The needle button will become green once your presser foot is lowered, and you can press it to start the stitching process. The machine will stitch an outline of your design. It doesn’t matter what color thread you choose because it will be hidden.
6. Place Applique Fabric On Outline
Now you have to place the applique fabric onto the base fabric; you can put your fabric onto your stitched outline in two different ways.
The first option is to use only a temporary spray adhesive. Spray the fabric’s backside and lay it over the outline of the applique place . While stitching, the glue will help to keep it in place.
The second approach is to use a fusible lattice to line the back of the applique material and hold it in place while the machine produces another outline or tackdown stitch on it.
7. Trim The Remaining Fabric
It is important to read tip for trimming machine applique. Take the presser foot and take the hoop out of the machine carefully. Cut the extra applique fabric away as near to the stitched lines as possible with the help of small sharp scissors, be cautious and learn the right way to use applique scissors. You have to perform this task very carefully and not to cut the stitches unintentionally, which will cause problems for you.
8. Apply Heat
This method is helpful if you are using in the hoop embroidery on fusible webbing. You have to attach the applique cloth to the base fabric with the help of a small iron. This will keep the embroidery from puckering during this process and after washing the fabric. You should utilize this method when puttin initials on appliques, sewing baby gifts or gifts or doing how to machine embrioder a little girls dress that need to be washed regularly.
9. Choose Right Thread Color
After applying the applique fabric on applique embroidery designs then, you should stick the border with the accurate thread colour because it will be visible. You should ensure your machine is threaded with the correct thread colours.
10. Add Tack-down Stitch
How to embroider with a brother sewing machine-You have to place the hoop in the machine and lower the presser foot at this step. To applicate embroidery,the machine will add a zigzag stitch if you press the green button. This stitch will use in the outline where the satin stitch will be applied as in apliques blouses embroideries. It’s commonly done with a V or E stitch. It will come into contact with both your applique and backdrop fabrics.
11. Remove Strayed Threads
The strayed threads look so ugly and vanish the overall charm of your applique design, so you have to remove them. You have to remove the hoop from your machine, trim all the long threads with scissors, and then use a lint roller to remove the fabric or thread lint.
12. Give A Finishing Touch
To remove any wrinkles from your embroidered hoop, you must press your finished design. This is the most important step among steps to embroider design on machine as it will give and neat and clean touch to your applique design.
Tips for Appliques using an Embroidery Machine
How to machine applique for beginners: To get the best results, you might follow the professional tips given below:
1. Make sure you only have one piece of fabric in your hoop when putting applique to a shirt or baby bodysuit. If you hoop both front and back, you’ll stitch both front and back, making it impossible to wear the shirt or bodysuit and be mindful of how long do you make applique stitches.
2. Trim the extra cloth as close as possible to the stitching outline without cutting the outline. Use embroidery machine grabber for trim.
3. After you have finished your pattern, use a lint roller to pick up any loose threads or pieces of fabric.
4. If you are going to stitch a terry cloth towel, first, you will need to put a water-soluble coating.
FAQs (frequently asked questions)
Conclusion
In the past, the applique was primarily done by hand; however, applique embroidery have recently become famous for the job. For most customers, machine embroidery applique increase design and efficiency while also providing a cost-effective solution. We hope you are sufficed on how to use applique embroidery machine from this article. Post a comment and tell us in case of ambiguities, our experts will get you covered. Please stay connected with us to get more helpful text like this.

Leave a Reply