
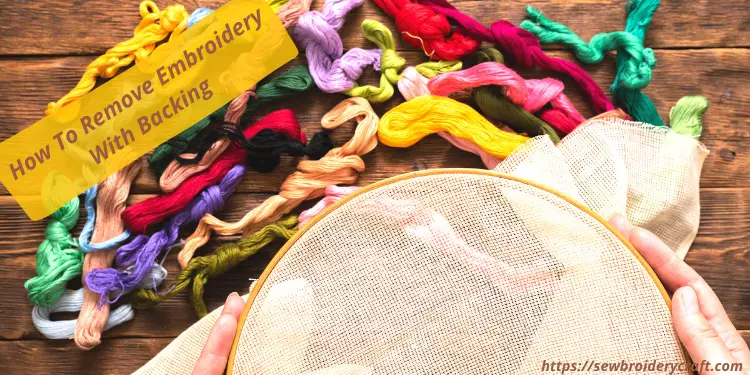
Embroidery on your clothes; shirts, jackets, scarfs, or anything, looks great. However, you may get bored with the embroidery design, or it may get damaged with time. It happens that you may want to keep your clothes but don’t want embroidery on them anymore. It is also possible that you want to redesign your clothes. For that purpose, you need removing embroidery first. If the embroidery has a backing behind, it’s important to get to know how to remove embroidery with backing first.
Also Read: Best Embroidery Machine For Custom Design
Removing embroidery with backing is hectic to remove than removing embroidery without backing. But why is there a need to add backing to the embroidery? Let’s explore it first.
Why add backing to the embroidery?
When you are a newbie thinking , is embroidering hard? and trying to learn it, the pattern must look neat. For that purpose, the garment should remain stable. If it keeps on moving, there will be no neatness in your embroidery, and you may end up not doing it anymore.
By adding a backing under the surface of the cloth on which you will do embroidery, the cloth will remain stable. It will work as a strong foundation under your embroidery pattern, and there will be no damage to your cloth too.
The most common form of backing is cutaway backing, used to cover embroidery stitches . The material used as cutaway backing is typically basic cutaway backing, mesh backing, or tear-away backing.
As the name indicates, the tear-away backing is removed after you are done doing the embroidery. So when we have to remove embroidery with backing, it will either be basic cutaway backing or mesh backing.
The most common use of basic cutaway backing/embroidery paper backing is for embroidery done with the help of a machine, not by hand. For hand-done embroidery, mesh backing works best. Removing embroidery with a backing will be the same whether it is basic backing or mesh backing.
Also Read: 11 Best Embroidery Machines in 2022
Now we know why there was a need to add the backing; let’s move towards the ways to remove embroidery with backing and the tools we will need.
Tools Required to Remove Embroidery with Backing
Before moving on to the methods to remove embroidery with backing, gather the embroidery stitch removal tools you will need throughout the process. We will also share with you why you will need each of these tools.
1.Tweezers
You can find it in your beauty box, so there is no need to rush to the market. It will help you out reach to remove machine embroidery stitches that are hard to remove by hand. Also, it will not cause any harm to the cloth as it is not so sharp.
2.Lint Brush/Lint Roller
You can either have a lint brush or a lint roller. Maybe you will find it at home. While you start removing the embroidery, it will help to remove fuzzy thread or dust from the surface. Resultantly, you will have a clear view of what to do next. You can use it repeatedly along with an embroidery remover during the embroidery removing process when the surface becomes full of rough threads again.
3.Duct Tape/Adhesive Tape
No worries if you don’t have a lint roller or lint brush at home and don’t want to rush to the market. You will surely find duct tape or adhesive tape at home. It can do the same job as the lint roller or lint brush. Just cut it out in small pieces and stick it on to the cloth. While you will remove the tape, the surface will be free from any dust or fuzzy threads.
4.Flat Working Surface
When considering how to get embroidery off a shirt, make sure you place the cloth on a flat working surface. This way, you can do the whole process easier.
5.Magnifying Glass
In embroidery, some tiny threads and stitches are difficult to locate, making them hard to remove. If you view the embroidery pattern with a magnifying glass, the whole process will be less tricky.
Methods- How To Remove Embroidery with Backing
In this section, we will tell you easy DIY methods on how to remove embroidery with backing. While you opt for the best way to remove embroidery stitches out of the following methods, gather the tools in the above section to make the process easier.
Using Seam Ripper
A seam ripper is a embroidery removal tool with a sharp pointed end, like a needle, that makes it easy to rip the small stitches and threads.
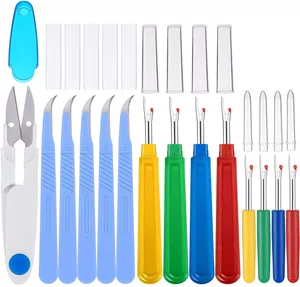
The first step of removing embroidery with backing is to turn the fabric inside out. This way, it will be easy to locate the exact location of the embroidery. Now use the seam ripper to rip off the backing making sure the cloth does not tear off.
After you are done removing the backing, next comes how to undo embroidery. With no more backing, you can easily see the embroidery stitches and rip them off with the seam ripper. After all the stitches are ripped, turn the cloth outside in. As you have already ripped all the stitches, all the threads will fall off when you touch them with your fingers.
Now clean the surface of the cloth with the lint brush or any other alternative tool to see if any stitches are remaining. If so, turn the fabric inside out again and rip off the stitches with the seam ripper. Now turn it outside again and remove the threads. Roll over the lint roller again, and the cloth will look as if there was no embroidery ever. Now you can redesign it the way you want. We will also cover how to remove embroidery without a seam ripper later in this article.
How To Remove Embroidery without a Seam Ripper
Using Stitch Eraser
A stitch eraser is a battery or electric-powered embroidery stitch remover that looks like an electric shaver or trimmer. It does a similar job as it removes the embroidery from the fabric with its small teeth.
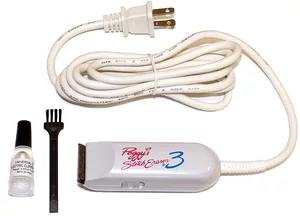
How to unstitch embroidery,Turn the cloth inside out and place it on the flat surface. Make sure you place the cloth on a flat surface while opting for the stitch eraser method to remove the embroidery. Otherwise, it may harm your clothes too.
Now run the stitch eraser over the backing, and it will be no more in a few minutes. Depending on how dense it is, you may need to run the stitch eraser over the embroidery a few times. This way, all the stitches will be removed. If a few are remaining, you can use tweezers or seam rippers to take them off. After that, turn the fabric, and all the threads will fall off. Clear the surface with the lint roller, and it’s all done.
With this is the easiest way to remove embroidery, by this method you can do the embroidery with a backing removal job in no time. However, you have to invest in buying the tool.
Using Electric Shaver
As we said, the stitch eraser looks like an electric shaver, and the working principle of both tools is the same, so why not remove embroidery with an electric razor and not invest in buying a stitch eraser?
The whole process will go the same. Choose a flat surface, turn the cloth upside down and place it there. Now run the electric shaver over the backing and then the embroidery. After all the stitches come off, turn the cloth again and remove the loose threads from the outer side with fingers. Use the lint roller or duct tape to clear the surface, and all is done. It is the best way to remove embroidery.
How to Remove Embroidery from Hat-Using Manual Razor
Manual razors can also do the job of a stitch eraser or an electric shaver but at a slow pace. You can use a plastic razor that is cheaper and readily available anywhere. Please make sure the one you use for embroidery removal services is new and throw it in the bin after removing it.
The easy way to remove embroidery is to place the fabric inside out on a flat surface, make sure it remains firm and doesn’t move. Now run the razor over the backing and the embroidery slowly, ensuring no harm to the cloth. After all the stitches are removed, turn the fabric to remove the threads from the outer side. Rub away all the leftovers with a lint brush or anything similar, and all done.
Tips to Remove Embroidery with Backing
Now you know can embroidery be removed and redone plus about all the tools and methods for how to remove embroidery with backing. However, you need to keep a few points in mind so that the process goes smoothly and results in a fine cloth without any marks. Here are a few tips that will surely help you out.
- Before you remove embroidery from the fabric, you want to redesign, practice your skills on a rough piece of cloth. This way, you will nicely remove the embroidery from your favorite fabric.
- You need to be patient while removing embroidery and its backing specially when removing embroidery from nylon, so make sure you have enough time. Also, you need to do it with concentration, or else you will ruin your favorite cloth.
- Use sharp tools with great caution, or else you will end up making holes in the cloth.
- Don’t pull the thread with extra force. If you do so, the holes that are already in the fabric will get bigger.
- Remove the embroidery from the backside of the cloth so that the visible damage will be less.
- The thread becomes weak when it is wet. So it is better to dampen the place of embroidery before you move towards the unstitch embroidery process.
- No matter what tool you use, don’t put extra pressure that it rips the cloth too.
- While the cloth behind the embroidery becomes visible, stop the process. Beyond that limit, there are higher chances of damaging the fabric.
- Ensure that the fabric is flat and tight, so all the threads are visible for easy removal. You can tighten the fabric with fingers or an embroidery hoop.
- If the fabric is old, the shade of fabric under the embroidery may be different from the rest of the fabric. In that situation, embroidery removal will be of no use.
Will Removing Embroidery Leave Holes– How to Remove Stitch Marks?
No matter how careful and skillful you are, there will still be some stitch marks on the cloth after removing embroidery and backing. After all the hard work, still, you are unable to redesign that fabric as it no longer looks new. Don’t be fed up; we will tell you how it will turn into new fabric, and you can redesign it.
After you are done with embroidery removal, and there are no more threads, iron the cloth. Now the cloth will be warm, so run your hands over it. Try to make the stitch marks smooth by putting a little pressure with your palm. This way, the pores will start to close.
As you repeat the process, soon, all the stitch marks will be no more. Now think of ways on how and how you want to redesign the fabric and start that process.
Frequently Asked Questions
Conclusion
If you get bored of the embroidery pattern on any of your fabric, get rid of it. It is not hard as you now know how to remove embroidery with backing. You have many options of embroidery removal and its backing with simple and readily available tools. Only take care to do it with concentration, and you are all set to redesign your clothes the way you want. We hope you will find our provided information helpful.
Leave a Reply